The Ultimate Setup Guide for Your Blackwidow Elite
The mechanical keyboard landscape is filled with endless options, yet few models have maintained the staying power and brand recognition of the Razer Blackwidow Elite. As a flagship entry in the widely celebrated Blackwidow lineup, this keyboard represents a pinnacle of wired mechanical performance, ergonomic design, and tactile satisfaction. For the enthusiast who has just unboxed this peripheral, the journey from a standard typing experience to a fully optimized workstation or gaming rig component requires more than just plugging in a USB cable. This guide provides an exhaustive look at how to maximize the potential of the Blackwidow Elite, ensuring that every keypress is as efficient and responsive as intended.
Understanding the Hardware: An Architectural Analysis
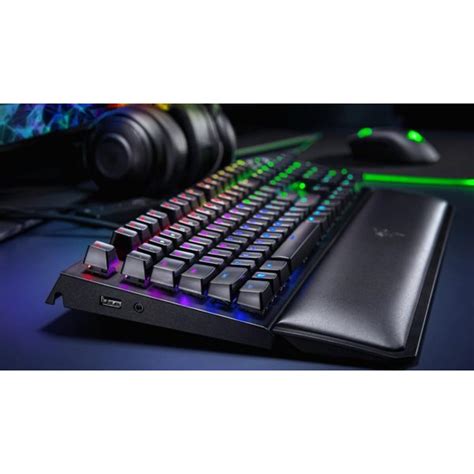
Before diving into the software configuration and lighting profiles, it is essential to appreciate the physical engineering of the Blackwidow Elite. Unlike its predecessors, the Elite model was designed to bridge the gap between a pure gaming tool and a professional productivity peripheral. The chassis is constructed from a military-grade metal top plate that provides significant heft and structural integrity. This weight is crucial for stability; when engaged in high-intensity gaming sessions or rapid-fire data entry, the keyboard remains firmly planted on the desk surface.
One of the most defining characteristics of this model is the inclusion of the multi-function digital dial and dedicated media keys. Located in the upper right-hand corner, these controls represent a major shift in Razer’s design philosophy, offering tactile feedback that mimics high-end audio equipment. The dial, by default, controls volume but can be remapped to perform a variety of tasks such as scrolling through timelines in video editing software or adjusting brush sizes in digital illustration suites. This versatility is why the Blackwidow Elite remains popular among creative professionals who require precise, analog-feeling inputs alongside their digital keys.
Beneath the keycaps, the Elite utilizes Razer’s proprietary mechanical switches. Depending on the specific variant purchased, users will find Green (tactile and clicky), Orange (tactile and silent), or Yellow (linear and silent) switches. Each switch type features dual side walls to provide greater stability and protection against dust and liquids. This engineering choice extends the lifespan of the switches to an impressive 80 million keystrokes, significantly higher than the industry standard for mechanical peripherals.
The Initial Physical Setup and Connection
To begin the setup process, notice that the Blackwidow Elite features a thick, braided cable that terminates in three separate connectors: two USB Type-A plugs and one 3.5mm audio jack. This can be confusing for first-time users. The primary USB plug, often marked with a keyboard icon or a Razer logo, powers the keyboard itself and facilitates data transfer for the keys. The second USB plug acts as an extension for the USB 2.0 passthrough port located on the left side of the keyboard. Plugging this in allows you to connect a mouse, a thumb drive, or a wireless headset dongle directly into the keyboard, reducing cable clutter on your PC’s I/O panel.
The 3.5mm jack serves a similar purpose, acting as an extension for your computer’s audio output. By connecting this to your PC’s sound card, you can plug your headset directly into the left side of the keyboard. This is particularly useful for users with shorter headset cables or those who frequently swap between speakers and headphones. Once the physical connections are established, the keyboard will default to a "Spectrum Cycling" lighting effect, indicating that it is receiving power and ready for software integration.
Software Optimization via Razer Synapse 3
While the Blackwidow Elite is functional as a plug-and-play device, the true "Ultimate Setup" requires the Razer Synapse 3 software. This cloud-based configuration tool is where you will unlock the keyboard's most advanced features. Upon installation, the software should automatically detect the Blackwidow Elite and prompt you to download the necessary modules.
The first tab to explore is the "Customize" section. Here, you can remap every single key on the board, with the exception of the Windows key and the Function key. This is also where you configure "Hypershift." Razer Hypershift is a powerful feature that effectively doubles the number of available keys. By assigning a specific key (usually the Caps Lock or a side button on a Razer mouse) as the Hypershift modifier, you can program a secondary layer of commands. For example, while holding the Hypershift key, the 'W', 'A', 'S', and 'D' keys could be mapped to media controls or complex macros, leaving their primary functions untouched for normal use.
Shop the latest Electronics picks on Amazon.
Shop Amazon →For gamers, the "Gaming Mode" settings within Synapse are vital. This mode allows you to disable the Windows key to prevent accidental minimizes during gameplay. Furthermore, you can choose to disable Alt+Tab and Alt+F4. While these may seem like minor adjustments, they are staples of a professional setup that prioritizes uninterrupted performance.
Advanced Lighting and Chroma Studio
The Blackwidow Elite is a centerpiece of the Razer Chroma ecosystem, featuring per-key RGB lighting. To set up your lighting like a pro, skip the "Quick Effects" and go straight to "Chroma Studio." This interface allows for layered lighting effects. A common sophisticated setup involves a base "Static" color (perhaps a subtle navy blue or deep forest green) with a "Reactive" layer on top. The Reactive layer ensures that whenever a key is pressed, it flashes a contrasting color (like white or gold) before fading back into the base color.
Environmental integration is another key aspect of the setup. If you use other Chroma-enabled devices, such as a mouse or ambient room lighting, ensure that the "Chroma Connect" module is active. This synchronizes the lighting across your entire desk. Furthermore, many modern games have integrated Chroma profiles that allow the Blackwidow Elite to reflect in-game events, such as turning red when your health is low or flashing when an ultimate ability is ready to use.
Ergonomics and the Wrist Rest
A frequently overlooked component of the Blackwidow Elite setup is the ergonomic plush leatherette wrist rest. Unlike many competitors that use hard plastic or clip-on mechanisms, the Elite’s wrist rest is magnetic and heavily padded. It is designed to sit flush against the bottom edge of the metal plate. For a proper ergonomic setup, the wrist rest should be positioned so that your palms rest on the padding while your fingers curve naturally over the home row. This elevation helps prevent wrist strain and potential long-term issues like carpal tunnel syndrome, especially during the long 8-10 hour stretches common for developers, writers, and competitive gamers.
Comparison of Switch Types
When setting up your workspace, the choice of switch significantly impacts the environment. The following table highlights the differences between the three primary Razer switches offered for the Blackwidow Elite to help you understand which environment suits your specific hardware variant.
| Feature | Razer Green Switch | Razer Orange Switch | Razer Yellow Switch |
|---|---|---|---|
| Feel | Tactile and Clicky | Tactile and Silent | Linear and Silent |
| Actuation Force | 50g | 45g | 45g |
| Travel Distance | 4.0mm | 4.0mm | 3.5mm |
| Actuation Point | 1.9mm | 1.9mm | 1.2mm |
| Best Use Case | Typing and General Gaming | Office Work and Stealth Gaming | Fast-paced FPS and MOBA |
Pros and Cons of the Blackwidow Elite
No setup guide would be complete without a balanced look at the strengths and weaknesses of the device. Identifying these helps users understand where the keyboard excels and where they might need to make adjustments in their expectations or peripheral ecosystem.
- Pro: Exceptional Build Quality. The aluminum top plate and durable plastics ensure the keyboard feels like a premium investment that can withstand years of heavy use.
- Pro: Versatile Media Controls. The digital dial is arguably the best in its class, providing a tactile, notched rotation that is incredibly satisfying to use for both media and productivity.
- Pro: Detailed Connectivity. The inclusion of both USB and audio passthrough makes it a true hub for your other peripherals, significantly aiding in cable management.
- Pro: Industry-Leading Lighting. Razer Chroma remains the gold standard for RGB customization, offering depth and integration that other brands struggle to match.
- Con: Massive Footprint. Because of the dedicated media keys and the large wrist rest, this keyboard requires a significant amount of desk real estate.
- Con: Loud Acoustics. Even with the Orange or Yellow silent switches, the hollow metal chassis can produce a "ping" sound if typing aggressively, which may be distracting in very quiet offices.
- Con: Software Dependency. To access the most advanced features, the Synapse software must be running in the background, which consumes system resources.
The Growing Importance of On-Board Memory
One of the more advanced setup steps involves configuring the Blackwidow Elite’s on-board memory. This keyboard allows you to save up to five profiles directly onto the hardware. This is a game-changer for users who move between different computers or participate in local tournaments. To set this up, go to the "Memory" icon in the Synapse dashboard and drag your favorite profiles into the color-coded slots on the keyboard icon. Once saved, you can cycle through these profiles using a customizable key combination (usually FN + Menu), allowing you to carry your custom macros and keybinds with you even on systems where Razer Synapse is not installed.
Maintenance for Longevity
An "Ultimate Setup" isn't just about the first day; it's about keeping the device in peak condition. Because the Blackwidow Elite has an open-frame design (the switches sit on top of the plate rather than being recessed), it is particularly easy to clean. Once a month, it is recommended to use a compressed air canister to blow out dust and debris from under the keys. For a deeper clean, the keycaps are standard cross-stem compatible and can be removed with a keycap puller. Cleaning the metal plate with a slightly damp microfiber cloth will keep the matte finish looking new and prevent the buildup of oils from skin contact.
Discover deals on Electronics — updated daily.
Shop Amazon →The wrist rest also requires attention. The leatherette material should be wiped down with a damp cloth to prevent the accumulation of sweat and salts, which can cause the material to crack over several years. Avoiding harsh chemicals or alcohol-based cleaners on the wrist rest padding is vital to preserving the integrity of the synthetic leather.
A Specialized Buying Guide: Who is the Blackwidow Elite For?
If you are still in the process of deciding whether to add this specific keyboard to your desk, consider its placement in the market. The Blackwidow Elite is a "Bridge" keyboard. It is intended for the user who spends eight hours a day in spreadsheets or creative suites and then four hours a night in a high-stakes gaming environment.
Those who prioritize a minimalist, "tenkeyless" (TKL) setup for more mouse movement space might find the Elite too cumbersome. However, for the power user who values dedicated shortcut keys, a full numeric keypad for data entry, and the convenience of passthrough ports, the Elite is often a more logical choice than its smaller siblings like the Huntsman Mini or the Blackwidow V3 TKL. When purchasing, pay close attention to the switch color. If you are in a shared office, the Orange switches provide the tactile "bump" of a mechanical keyboard without the sharp "click" that can frustrate coworkers. If you are a solo gamer, the Green switches provide the most iconic mechanical experience.
Real-World Use Cases: Beyond Gaming
While the marketing for the Blackwidow Elite focuses heavily on esports, its utility in professional fields is vast. In video editing, the digital dial can be mapped to the "Jog/Shuttle" function, allowing editors to frame-advance through footage with physical precision. In coding and software development, the ability to create complex macros for repetitive strings of code or frequent Git commands can save hours of cumulative time over a work week. Even writers benefit from the stability of the keyboard; the heavy chassis ensures that even during a fast typing flow, the board never "walks" across the desk or flexes under pressure.
Furthermore, the audio passthrough is a hidden gem for conference calls. By plugging a headset directly into the keyboard, users can easily manage their cables and stay organized during meetings without reaching behind their PC tower. These quality-of-life features elevate the Blackwidow Elite from a simple input device to a central workstation hub.
Conclusion
Setting up the Razer Blackwidow Elite is a process of balancing physical ergonomics with digital customization. By taking the time to properly route the passthrough cables, dial in the perfect tactile switch for your environment, and master the secondary layers of the Hypershift system, you transform a standard mechanical keyboard into an extension of your own workflow. Whether you are aiming for the top of a leaderboard or simply trying to streamline your professional output, the robust build and deep software integration of the Elite provide all the tools necessary for success. It remains a testament to the idea that a keyboard can be both a flamboyant piece of RGB art and a serious, dependable tool for daily labor. Fine-tuning the details of your setup today ensures that this hardware remains a reliable companion for the millions of keystrokes yet to come.